Learn Collage
Collect Collage Materials
It will be fun to collect common, everyday materials and use them in a collage. The lessons below will show you, step by step, how to create a "visual vocabulary" by collecting "found" papers and making papers for your collages. You will be amazed at what you can create using the collage technique. All of a sudden, your world will become a vast resource of collage material!
What you will need to start
**Cardboard or heavy card stock-cut into small squares ( 5" x 5", 8"x 8", 5" x 8", 8" x 11" etc.)
A glue stick
Scissors
Sketch book paper
Small set of acrylic paints or water colors
Brush assortment
**A collection of found papers from magazines, wall paper, junk mail, journal and wrapping papers, tissue, etc.
Most of these materials can be easily purchased online or from your favorite art supply store.
Collage Lesson 1
Collect papers from magazines, books, posters, packaging as well as fabric, leaves, sandpaper, twine, pictures and pages from magazines and newspapers, wall paper, wrapping paper, feathers, leather, foil, stamps, and photos. What is interesting to you? Tear out the page, collect the leaves, look for textures papers. Something online? Print it out for your personal collage collection.
Collage Lesson 2
Paper Quilt Project
Use one of your heavy paper or cardboard pieces and choose two sets of papers from your collage collection. One set should have the same or similar colors and the other set should have the same or similar patterns or textures. For example, you could choose a set of papers that are basically blue in color. Then you could choose another set of colors that have stripes. Make sure you have enough papers in these sets to cover your cardboard or card stock square and also give you plenty of choices for your collage composition.
Now cut a template shape from a plain piece of paper. This template will determine the shape of both sets. The template should be a simple shape, such as a square, triangle or rectangle. Make sure that the shape you make, when repeated, will fit in rows on to the cardboard square you are using.
Using the template, cut many shapes from both sets. You will want many so that you will have plenty two choose from to make the paper quilt.
Arrange the cut out pieces on the cardboard in a simple pattern. Experiment with shapes and colors to create an interesting pattern. When you are finished arranging, carefully glue each piece down. Cover the entire surface and trim the edges if necessary. Make sure all shapes are touching and that there are no gaps between the shapes.
Watching my video will help you create this project successfully.
Second Paper Quilt Project
Using plain copy or sketch book paper, do some painting! Paint anything you want--abstract designs, blending the colors and using washes of dilute color. Have fun experimenting with painting! If you want, add lines with a pen, pencil or crayons. Keep loose and have fun! Do at least five 8" x 11" paintings and let them dry. Don't worry about making a picture or a work of art because your paintings will be cut up and re-assembled into a paper quilt collage!
If you have some paintings that you have done you might like to cut up to make a quilt, now is the time to do it!
You will make one or two template shapes again, making sure that the combination of these shapes when repeated fit on to the cardboard square you have chosen for you painted paper quilt.
Combine the shapes you have cut, positioning and re-positioning them to see how these shapes interact with each other to form new shapes and patterns. Experiment with combinations of shapes until you like what you have put together. Then glue the shapes down. Trim the edges and make sure no gaps exists between the shapes.
Watching my Painted Paper Quilt video will help you visualize and complete this project successfully
Collage Lesson 3 – Self-Portrait
Select a picture of yourself or take a "selfie" and print it out on your computer. The picture size should be at least 6" x 6".
Now choose papers that are similar in color and texture to your picture of yourself. You don't have to match the colors and textures exactly, because here is a chance to use DIFFERENT colors and textures instead of what is in your picture!
Cut pieces of paper and glue them on to your picture. Look closely at the variations in skin and hair color and try to replicate them with collage papers.
You will find that your self-portrait result is amazing! Often the end product of this self-portrait collage exercise is amusing, lyrical, magical or scary!
I the effect of your finished self-portrait is not to your liking, just keep pasting papers over it until you like what you have made.
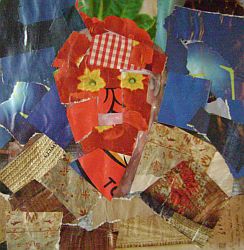
Self-portrait Collage
Materials: magazine papers, photos, wallpaper
By Lois DeWitt
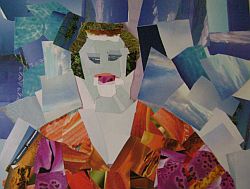
Self Portrait Collage
Materials: magazine papers, junk mail papers, wall paper
By Lois DeWitt
Collage Lesson 4– A Collage That Can Become A Painting
On one of your cardboard or card stock backings, make a collage using subject matter and papers and other materials of your choice. Have fun combining colors, textures and images! When you are done you will have an interesting subject for making a painting or drawing.
Drawing or painting your collage will help you see your collage work in a new and exciting way.
Watching my video on "Collage That May Become A Painting" will help you create this project successfully!
Collage Lesson 5--Make A Collage From Photos
Collage Lesson 6 - Greetings!
Collage is a wonderful way to create a greeting or note card for someone special. You can use copy or sketch book paper for the card. Make it a shape that can fit into an envelope.
Make your greeting or note card collage on a separate piece of copy or sketch book paper and make it a bit small than your card size. Make several small collages that can be candidates for a note or greeting card. Consider the content. For example, if you want to make a card for your sister and you know she loves birds, you can either find papers and photos with pictures of birds or cut bird shapes out of various papers.
Creating an original, hand made card for someone special is a truly a fine and thoughtful gift!
Why Not Have A Collage Party?
Collage Lesson 7 - Abstract Collage
Choose a wide variety of objects and materials from your collection or find new and interesting materials (like beads, feathers, foliage) for this abstract project.
Experiment with how the papers and other materials can be combined in an interesting collage composition. Consider color, texture and content. As you assemble the materials, ask yourself, "What do I see? Is this happy, magical, scary? Do I like this? What could I do to improve, change or accentuate the elements of this abstract collage project?"
Work to develop a "feeling" about these objects. For example, if you have some small pieces of driftwood, twigs, shells and some sand, you could arrange these materials in a collage to evoke a feeling of the sea shore or nature. Another example would be, if you have ribbon, glitter, silk and velvet fabric and beads, you could arrange these materials to evoke a feeling of a rich decor, shabby chic or fashion statement.
This last project is open-ended. It allows you to choose materials and assemble them towards a personal statement. If you continue working in this fashion, you will discover your own preferences for certain materials and ways of putting them together.
After you have completed all of the collage lessons, line up all of your completed projects and look at them carefully. Which one is the most interesting to you? Which one do you dislike? Why? How would you like to keep on working with collage? I hope so!
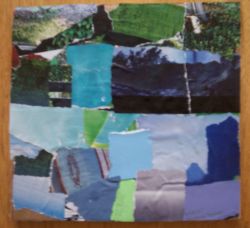
"Blue Backyard"
Materials: sandpaper, magazine papers, twine, photos, envelopes
Collage by Lois DeWitt

The collage horses inspired me....
I collected papers from magazines, newspapers and junk mail. Some I printed by pressing fragments of paper on to a glass surface I had painted with acrylic paints. This added interesting texture and colors to the found papers.
I assembled the papers into interesting patterns and colors and glued them together. I drew a horse shape on the assembled papers and carefully cut it out. Then I glued the horse shape on to a piece of mat board.
Be inspired to try new and different collage techniques! Any material, any idea, any assembling technique! Use content, colors and textures that you love! Experiment with assembling a variety of materials and position/re-position the collage elements towards an interesting collage composition!
Collage Lesson 8--Using Fabric For Collage
Real Feedback
When I saw your Ezine article, at first I thought it said, "Are you ready for college?"
and I was looking to go back to school. Then I read you article on collage and found it interesting. So then I took the collage
lessons on your website and had a ball!
I've been collecting collage stuff ever since and have gotten interested in journalizing.
Beth Taos, NM
-----
Thank you for sending the links. I live in Sunnyvale, California. I came upon your site when I was searching the internet for some ideas for developing lessons for a free art class I wanted to offer kids in my neighborhood.
Best regards,Saba
-----
Your demos are great. What a fine way to get used to working with oil pastels. Dave Cornwell
-----
I liked to draw in grade school. The teacher scolded me for "doodling" on my note pad and I had to stay after!
I always felt that was unfair and when I saw the doodle lessons on your website I knew I had to get back to art and find the artist in me again.
Doodling Doris Schanks
-----
I really enjoy your classes. It has really helped me improve my skill with various
materials. Also, I love your voice on the videos...very relaxing.
Gena Smith
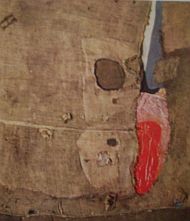
Found materials (burlap) collage by Burri
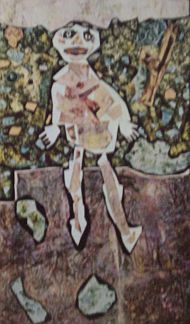
Collage made of cut-up paintings) by Dubuffet
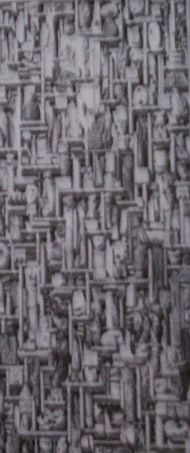
Collage/Assemblage (painted wood scraps) by Nevelson
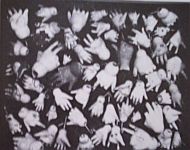
Collage (doll parts)by Arman