Basic Drawing
Lesson Six: Draw A Landscape
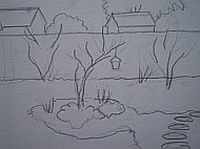
Here's a simple sketch I did of my back yard.
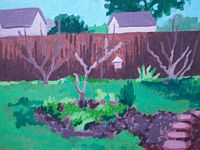
A sketch can become a painting.
Landscape drawing presents several options: going outside, looking out of a window or drawing from a photograph.
Drawing outside, you may need an easel, either to sit or stand at. Protection from the elements includes hat, clothing, insect repellent, sun glasses, gloves, bottled water. Lighting changes rapidly, be prepared to alter your drawing to adapt to those changes (Monet did many quick sketches and paintings to capture the changes of lighting on haystacks during the day.)
I have drawn landscapes from the comfort of my kitchen, A porch offers shelter and shade and even the tailgate of a car is fine for sitting and drawing.
If you work from photos you have more time to draw and not not challenged by weather or changing of light. I encourage you to try all options or choose the best setting for you.
Whatever you choose, keep your drawing simple. Landscapes are rich in detail, textures, light and shadow. Choose what you want to include in your drawing. Consider using a template viewfinder to help you select a certain area to draw. On a sheet of paper rule a 4" x 4" square and cut it out. Hold the template up to the landscape area you have chosen. It will frame a specific area of the landscape and help you choose what part you want to draw.
You can't keep holding the viewfinder up and draw at the same time, but it is possible to remember the framed area to draw it and to refer to the viewfinder from time to time.
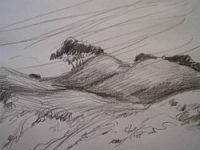
I wanted to capture a mood of the chill wind and the bleak beauty of this coastal landscape. I employed sweeping diagonal lines to depict the wind and contrasted the dark outline of the trees with the pale grass and sand of the mounds. It was a quick sketch for soon afterward, the rain came and I had to pack up my drawing supplies and head back to my car.
I encourage my students to explore their imaginative drawing skills by doodling, scribbling and sketching. New forms develop and new methods of making images often come from this loosened-up practice!
I give my students a basic drawing composition checklist that is useful for more detailed drawings ( trees, grass, structures, sky, water, etc.) As their drawing is developed, they can refer to it periodically.
A variety of shapes and sizes is more interesting than one shape and one size. Several sizes of trees, for example, a fence, stone wall or brook create contrast in shape and texture. Large objects in the fore ground, an object in the middle ground and some in the distance (background) create volume, express space and changes in atmosphere, light and shadow.
Centrally placed objects are boring and usual. Objects placed off to the side are more interesting, especially if balanced by a variety of other objects on the other side. This sets up a tension between the two groups of objects and invites the viewer's eye to go back and forth between them.
Diagonal movement (how your eye travels around the various elements in the landscape) is more interesting that vertical and horizontal movement. For example, if you draw a road going off at a diagonal or angle it will be more interesting that if you draw the road going off in the distance straight ahead.
Contrasts in light and dark are more interesting than over all gray or lack of contrast. There is no disputing the drama and interest that light and shadow gives to a landscape drawing. It captures the time of day, the mood, and often, gives a temporal quality that speaks of the passing of time.
A mood or feeling conveyed by a drawing makes it provocative, as compared to a rendering which simply describes an object scientifically. Now that you have the skills to draw what you see, use those skills to be as accurate as possible, but don't make accuracy the purpose of your landscape drawing. Consider the "soul" of the subject matter and be inspired by what lies beneath the forms and how they resonate with you as the artist.
Now that you are aware of some of the composition guidelines (which are valid for any subject matter) and are armed with your selective template, your pencil or pen, and your sketch book, you can proceed with your landscape drawing!
Here's a video that will be helpful, although the drawing is done in conte crayon. The shading skills are similar to pencil drawing.
Map out the general drawing. Treat all elements (trees, buildings, rocks, grass, water, etc.) as basic shapes. Fill the page with all elements before beginning shading or dealing with detail. Rely on the pencil gauge method to make sure you have it all down as accurately as possible. Check and re-check the sizes and scale of all objects and their placement.
When you have drawn everything in, consult your compositional check list. Have you chosen an interesting arrangement of objects of different sizes and shapes? Is there diagonal movement? Do YOU find what you have done interesting?
Now, continue and simplify shading, putting basic shadows and highlights down first or drawing in basic shading and light areas. Remember, copying all the little lights and shadows will not effectively develop your drawing. Develop your shading slowly and remember, where you leave the white of the paper, that will be light! As you develop your drawing, think of the mood or feeling it conveys. You may want to emphasize certain shapes or shadows. Lastly, make decisions on what detail you want to draw and what detail you want to leave out.
When you are finished with your landscape drawing, put it up on a wall, step back and look at it carefully. Are you shadows and highlights successful? What mood or feeling does your drawing convey? Did you like working with landscape as subject matter or would you prefer another kind of subject matter?
Draw, Draw, Draw!
You have learned many drawing skills. Fill your sketchbook with drawings. Make notes about what you are drawing and learning. Do not be afraid to draw--draw anything--houses, boats, goats, girls, computers, bicycles, toys, fruit or friends!
You cannot make mistakes. That little voice in your head may tell you that this or that is wrong, that you STILL can't draw and never will, that your sister's friend can draw better than you, etc. etc. Just turn that voice off and draw. And if you don't feel like drawing subject matter, doodle! If you need more encouragement on this, please read "Drawing On The Right Side Of Your Brain" by Betty Edwards.
In my years of teaching, when students get discouraged about their drawing abilities, I ask them to look at the first pages of the sketchbook journal, then look at their most recent drawings. Invariably, they are not aware of their progress and are heartened to see that indeed, they really have improved in their drawing capabilities! I have never known this to fail.
Keep a sketchbook journal. If you are faithful to it, drawing daily anything you like and working on your skills will be enriching and rewarding to your life and how you see yourself. Over a three to four week period with beginning students or students that need to refresh their skills, there amazing improvement. This is certain. I have seen it many times in my 45 years of teaching drawing.
So, draw, draw, draw. The skills and techniques you learn will be valuable for your artistic development, not only in drawing, but in every other creative discipline, including, painting, printmaking, sculpture and ceramics.
Please email me about your experience with the Basic Drawing Lessons. I welcome your questions and comments!
Real Feedback
Dear Ms. Dewitt,
Thanks so much for your drawing lessons! I home school my six and eight year old girls and they did so well with the drawing and the short and sweet projects.
I think I have two budding artists now! Will continue with the oil pastels next month--we're looking forward to it!
Sincerely,
Amy C.
Iowa City

Watch my video on how to "Draw Your Hand"
I am new at drawing. I was not able to do much for a couple years because of injuries from an auto accident.
I can move better now and my doctor recomended some kind of art therepy. I took a class at the high school but my wheelchair made it hard to get around in the classroom.
When I saw your website I thought this is for me. I am drawing now and have improved since I started whcik is a great feeling!
And your comments have been real encouraging, thanks
Frank Markey
Here is my pencil drawing of Fort Fisher, NC. I used my trusty Eagle Turquoise 6B pencil to capture this blustery, gray November day.
Drawing on site, I taped everything down, but lost one nice sketch to the ocean! It was devoured by the waves...Lois

I set up a simple arrangement of objects, drawing them first as basic shapes using the pencil gauge method, then slowly developed the drawing, looking closely at the shapes of the tea pot, and the grapefruit.
Then, I shaded in the light and shadow. In this case, because there was a diffused light and not much highlight and shadow, I manufactured it. I put shadow basically on the sides of the objects because the light was coming straight from behind me. I left a lot of white paper to indicate light on the still life objects. This works!
If you can't set up a light on the side of a still life, pretend light and shadow works well. Just decide where the shadow will go and where the light will be and shade accordingly. Remember the circle and pyramid exercise? Give this a try!--Lois